
Goodness! Christmas time, and the feasts are just around the corner! When is a better time to start cooking than now? Who knows! So, that is what I have done, started cooking for the christmas meal. This is my roast chicken, and it is -so- delicious. What is the biggest problem of roast chicken? Dry meat. Sure, you can cook it in a bag, but then you end up with steamed/boiled chicken, rather than the crispy deliciousness in the skin. You follow this recipe, including the stuffing, and you will have a tender, moist, fall off the bone (literally, as you'll see later) roast chicken that you can eat from skin to stuffing and adore every mouthful.
For this you will need:
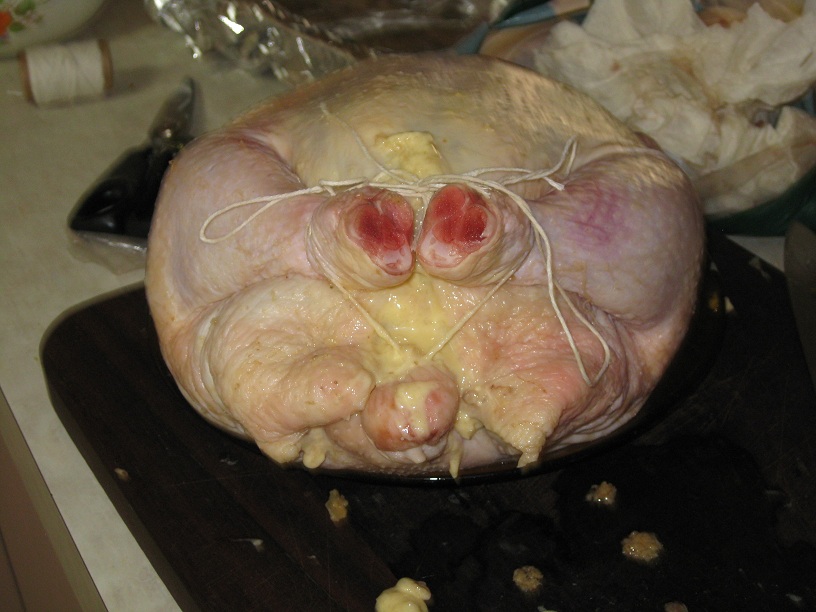
1 whole chicken (the one above was a 2.5kg unstuffed, and it weighed in a whopping 3.8kg in the tray)
2 heaped tsp minced garlic
2-3 Tbsp butter
Stuffing:
1 whole brown onion
4 garlic cloves
2 1/2 - 3 cups of breadcrumbs
1/4 cup of milk
2 eggs
2 tsp worchestershire sauce
1 tsp dried parsley
1/2 tsp 'italian herbs'; oregano, thyme, etc. Most supermarkets have the mix already.
A shake or two of salt and pepper, just a little bit, enough to 'lift' the flavour.
Now, first things first, you'll want to make up the garlic butter, because this is going into the skin of the chicken and it keeps the juicy deliciousness in the chicken, rather than in the pan. This isn't rocket science, toss the minced garlic (from a jar so it's juicy) into a bowel with the butter, and mix it in thoroughly, so that the butter is soft and melted and mixed in with the garlic. Put the bowl in the fridge so that the butter can cure again. It's going to be messy enough to stuff the skin as it is, without arguing with melted butter.
For the stuffing, which is the next step in this thing, you want to top and tail chop the onion, make a shallow cut in the side and peel off the first layer of the onion. That is basically the brown crinkly skin, and the softer flesh of the outermost ring, this way you have crisp, fresh, easy to cut onion. Cut it in half (if you have a smaller onion, add a second one, you want about one and a half cups of diced onion), slice and dice and chop it up into teeny pieces. If you're not so skilled with a knife, you can do the chef thing. Set the tip of the knife on the cutting board, hold it in place with one hand, and go to town on your onion slices, and make them small and tiny. You want as much of the onion juice and flavour to caramelise. Slice and dice the garlic cloves, remove the papery outer layer first of course, that's not very nice to eat!
Heat up a pan, spray a bit of oil in so the onions and garlic don't stick and fry them up. So that they are softened, and lightly golden, not browned or burnt. Set aside to cool.
While that's cooling, put the breadcrumbs into a bowl, along with the herbs, salt pepper and worchestershire sauce. Be aware that the sauce does have salt in it, so be careful with the salt, if you're not sure, leave it out. Stir it in together, and toss in the fried onion and garlic. Make sure it is cool to touch, that is not 'wow that's still warm! ow! hot' or anything of the sorts. This'll take about fifteen minutes or so. Make a little hole in the middle of the mix, drop in your two eggs, all of them, yolk and white, and the milk into it, stir it around and mix it in thoroughly. The texture of the stuffing should be firm, but slightly sticky. Like it clings to your fingers, but does't pull apart when you extract your hand. Like good quality clay, if that helps any.
Now we get to do the really really fun stuff. MOLEST THE CHICKEN!
But before we can get in up to our elbows (nigh literally) we need to do a little bit of cleaning. If you check out the inside cavity of your chicken, you want to make sure that whoever killed it did a good job of pulling out all the insides. If they didn't ...well.. guess what? You get to! Just yank it out, whatever it is, and discard (unless you like to eat the giblets). If you have a nice clean chicken with nothing left behind, pour out the blood (if there is any inside the cavity) partially fill the hole with water, slosh it around to rinse and wash, and pour it out. Use napkins or paper toweling to dry out the inside of the chicken (yes it will come out pink, this is normal. You need to keep patting and burying your hand inside this poor chicken until the napkin comes out either dry, no longer pink, or just no longer pink. A little water won't hurt the stuffing).

Now, inspect your chicken one last time. Check it out! If there are any feathers left behind (pin feathers and so on) take to them with a pair of tweezers. Just lift the leg, and go after the nether regions. Really, the chicken has no shame and it doesn't care!
Once the inside of your chicken is dry and clean, and any pesky feathers removed, you get to stick your hand inside again, yay! This time, with stuff on it! Literally. Get easy to manage handfuls of the stuffing, and put it into the chicken. Pack it in solidly, the idea of this is to help support the ribcage and reduce the chance of your chicken from collapsing. If you don't have enough to -completely- fill the cavity, don't stress too much, it will expand as it is cooked.
Next, you get to -really- molest your chicken. Pull out the garlic butter you prepared and put in the fridge earlier, and use a simple teaspoon -- preferrably one with a long handle -- to apply the butter. Where are we applying this? Inside the chicken skin. Between the skin and the flesh of the chicken.


I say long handled teaspoon, because you need to push the butter as far 'down' in the gap between skin and flesh as possible, and you need to separate it from the flesh in the process, so that the butter can melt down and spread across the whole of the chicken as it cooks. As you push the butter in, you get to molest your chicken. It's not very neat, not very dignified, as you really have to massage the chicken to spread the butter around under the skin, get as much of it over the breast meat as you can, as this is where you primarily need the extra moisture.

Next, you'll want to get some cooking twine, and tie the legs of your chicken together, up over the cavity and the stuffing. If you can, catch the parsens nose (the chickens tail, that triangular bit) in the process, but if you can't no drama, just tie it up afterwards, this keeps your chicken nice and neat while roasting, and keeps more stuffing inside the chicken, which expands it a little more and gives you an appealingly plump looking bird.


That's it! Really. Well, nigh on. As mentioned, my chicken was a whopping 3.8kg once all this was done. I have a fan forced oven, convection I think? So I preheat it to 180 degrees Celcius, and put the chicken in. 50 minutes for the first cycle, then I pulled it out, levered it up (with help to hold the tray down)to detatch it from the alfoil on the tray, and enabling that later, when it is completely cooked, if you pull it from the tray you won't leave half the chicken behind. This is important! It goes everywhere if you leave half of it in the tray. Back in the oven for a further 50 minutes (you can pull it out after 40, if it 'smells cooked', but I found that left the bones still uncooked. The meat was done through and through, but the bones were still slightly pink). Pull it out and check, even if you do wait the 50 minutes, stab the breast, and thigh with the tip of a knife, or a cake skewer, if liquid comes out, it should be clear, though, mine didn't leak at all. If you are still unsure, slice down the skin between the leg and the body, and look at the base of the thigh.

Untie your chicken, if it is completely cooked, if not, put it back in the oven for a further 10-15 minutes, try not to overcook though. I think it will still get dry even with the effort put in to prevent that. Another good way to tell if your chicken is cooked through, is if the stuffing has expanded 1/4th to 1/2 again the original size.

Now, as this is going to be for christmas, and you have the family up, you want to make sure everyone is happy! So carve that chicken. If you have a big family, add chickens as you need, if you haven't a 2.5kg one like I did.

Oh also, be careful in picking up the bones of the chicken. You may leave the meat behind. -_-

Lets try this again... Ah! Here we go.

Doesn't that just look delicious? Now, how about the important part? The legs and thighs are -always- succulent and juicy, because the belly is where the chicken stores all it's fat. The belly, by the way, is the soft squishy part at the end of the breastbone. You have just cooked a chicken on its back. Yay for anatomy!
The important part, the real test is if the chicken -breast- is juicy, and succulent. This isn't all that easy, usually, when you are relying on the chicken's natural juices, it all ends up in the pan. But we pre-empted that, didn't we? We had butter and garlic to soak into the breast and look at that. Isn't this mmmmm. So good, at least, -I- think so.

Lastly, not leastly, once you have carved as much meat from the chicken as you can, or care to (I didn't bother with the back, it's too fiddly to peel off, and no one would take the small pieces other as snack type things in any case) you can carve the stuffing. Yes. Carve it.

The outermost edge of it will be crispy and firm, but the inner layers of the stuffing will be soft, moist and exceedingly edible. If you didn't over season with the herbs when you were making it, that is, and you shouldn't have. It really only needs a -little- amount. The frying of the onion and garlic earlier makes a sweetness in the bread, and having garlic in the stuffing as well as in the butter you stuffed the skin with, it means that the chicken flesh will be tender, juicy, and flavoured from skin to bone, with no lessening of flavour in any part, just potential 'extra' flavouring in some parts, like the oysters. And the back of the chicken, since that is the part of the chicken that was sitting and basting in the juices.
This tastes best hot, so either cook and serve it on the day, or cook it early and reheat it in the microwave later. Again, just be careful not to dry the meat out, so reheat it under gladwrap -- clingwrap -- with a few holes poked to keep the moisture in. And, enjoy! Oh, you -may- have to fight with your relatives, and your own self-control, to not eat this as soon as it comes out of the oven once tasted. I had to keep on chasing my family away with a pair of tongs so that other family would get to enjoy it! It is like... an exctatic food orgasm in your mouth. So good.
Deliciousness Delivered.
That is a very good, crispy looking, chicken. Mind, I don't like stuffing in general, and when I use it--it's either something with rice or something with minced meats and bacon--but the chicken itself looks very tasty.
ReplyDelete