Friday, December 23, 2011

Christmas Feast Part 1 - Roast Chicken


Goodness! Christmas time, and the feasts are just around the corner! When is a better time to start cooking than now? Who knows! So, that is what I have done, started cooking for the christmas meal. This is my roast chicken, and it is -so- delicious. What is the biggest problem of roast chicken? Dry meat. Sure, you can cook it in a bag, but then you end up with steamed/boiled chicken, rather than the crispy deliciousness in the skin. You follow this recipe, including the stuffing, and you will have a tender, moist, fall off the bone (literally, as you'll see later) roast chicken that you can eat from skin to stuffing and adore every mouthful.

For this you will need:

1 whole chicken (the one above was a 2.5kg unstuffed, and it weighed in a whopping 3.8kg in the tray)
2 heaped tsp minced garlic
2-3 Tbsp butter

Stuffing:
1 whole brown onion
4 garlic cloves
2 1/2 - 3 cups of breadcrumbs
1/4 cup of milk
2 eggs
2 tsp worchestershire sauce
1 tsp dried parsley
1/2 tsp 'italian herbs'; oregano, thyme, etc. Most supermarkets have the mix already.
A shake or two of salt and pepper, just a little bit, enough to 'lift' the flavour.

Now, first things first, you'll want to make up the garlic butter, because this is going into the skin of the chicken and it keeps the juicy deliciousness in the chicken, rather than in the pan. This isn't rocket science, toss the minced garlic (from a jar so it's juicy) into a bowel with the butter, and mix it in thoroughly, so that the butter is soft and melted and mixed in with the garlic. Put the bowl in the fridge so that the butter can cure again. It's going to be messy enough to stuff the skin as it is, without arguing with melted butter.

For the stuffing, which is the next step in this thing, you want to top and tail chop the onion, make a shallow cut in the side and peel off the first layer of the onion. That is basically the brown crinkly skin, and the softer flesh of the outermost ring, this way you have crisp, fresh, easy to cut onion. Cut it in half (if you have a smaller onion, add a second one, you want about one and a half cups of diced onion), slice and dice and chop it up into teeny pieces. If you're not so skilled with a knife, you can do the chef thing. Set the tip of the knife on the cutting board, hold it in place with one hand, and go to town on your onion slices, and make them small and tiny. You want as much of the onion juice and flavour to caramelise. Slice and dice the garlic cloves, remove the papery outer layer first of course, that's not very nice to eat!

Heat up a pan, spray a bit of oil in so the onions and garlic don't stick and fry them up. So that they are softened, and lightly golden, not browned or burnt. Set aside to cool.

While that's cooling, put the breadcrumbs into a bowl, along with the herbs, salt pepper and worchestershire sauce. Be aware that the sauce does have salt in it, so be careful with the salt, if you're not sure, leave it out. Stir it in together, and toss in the fried onion and garlic. Make sure it is cool to touch, that is not 'wow that's still warm! ow! hot' or anything of the sorts. This'll take about fifteen minutes or so. Make a little hole in the middle of the mix, drop in your two eggs, all of them, yolk and white, and the milk into it, stir it around and mix it in thoroughly. The texture of the stuffing should be firm, but slightly sticky. Like it clings to your fingers, but does't pull apart when you extract your hand. Like good quality clay, if that helps any.

Now we get to do the really really fun stuff. MOLEST THE CHICKEN!

But before we can get in up to our elbows (nigh literally) we need to do a little bit of cleaning. If you check out the inside cavity of your chicken, you want to make sure that whoever killed it did a good job of pulling out all the insides. If they didn't ...well.. guess what? You get to! Just yank it out, whatever it is, and discard (unless you like to eat the giblets). If you have a nice clean chicken with nothing left behind, pour out the blood (if there is any inside the cavity) partially fill the hole with water, slosh it around to rinse and wash, and pour it out. Use napkins or paper toweling to dry out the inside of the chicken (yes it will come out pink, this is normal. You need to keep patting and burying your hand inside this poor chicken until the napkin comes out either dry, no longer pink, or just no longer pink. A little water won't hurt the stuffing).


Now, inspect your chicken one last time. Check it out! If there are any feathers left behind (pin feathers and so on) take to them with a pair of tweezers. Just lift the leg, and go after the nether regions. Really, the chicken has no shame and it doesn't care!

Once the inside of your chicken is dry and clean, and any pesky feathers removed, you get to stick your hand inside again, yay! This time, with stuff on it! Literally. Get easy to manage handfuls of the stuffing, and put it into the chicken. Pack it in solidly, the idea of this is to help support the ribcage and reduce the chance of your chicken from collapsing. If you don't have enough to -completely- fill the cavity, don't stress too much, it will expand as it is cooked.

Next, you get to -really- molest your chicken. Pull out the garlic butter you prepared and put in the fridge earlier, and use a simple teaspoon -- preferrably one with a long handle -- to apply the butter. Where are we applying this? Inside the chicken skin. Between the skin and the flesh of the chicken.


I say long handled teaspoon, because you need to push the butter as far 'down' in the gap between skin and flesh as possible, and you need to separate it from the flesh in the process, so that the butter can melt down and spread across the whole of the chicken as it cooks. As you push the butter in, you get to molest your chicken. It's not very neat, not very dignified, as you really have to massage the chicken to spread the butter around under the skin, get as much of it over the breast meat as you can, as this is where you primarily need the extra moisture.


Next, you'll want to get some cooking twine, and tie the legs of your chicken together, up over the cavity and the stuffing. If you can, catch the parsens nose (the chickens tail, that triangular bit) in the process, but if you can't no drama, just tie it up afterwards, this keeps your chicken nice and neat while roasting, and keeps more stuffing inside the chicken, which expands it a little more and gives you an appealingly plump looking bird.


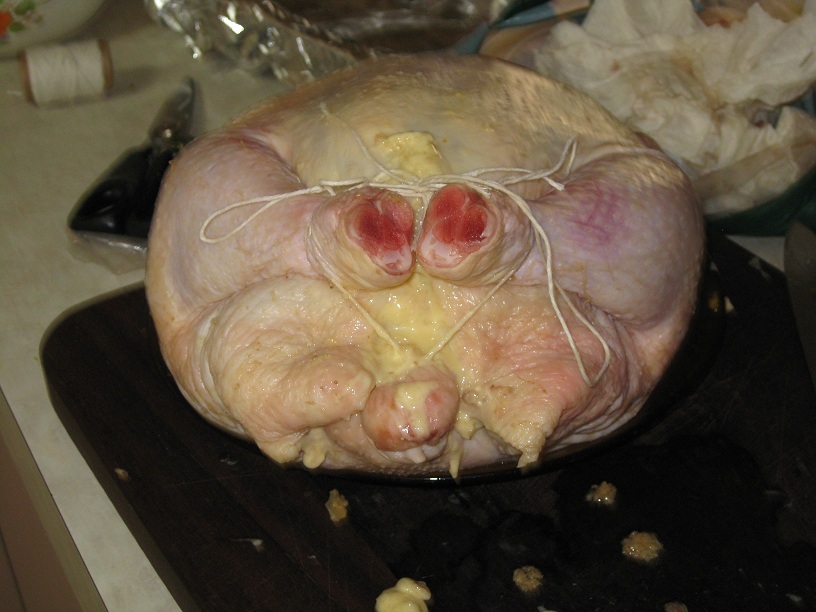


That's it! Really. Well, nigh on. As mentioned, my chicken was a whopping 3.8kg once all this was done. I have a fan forced oven, convection I think? So I preheat it to 180 degrees Celcius, and put the chicken in. 50 minutes for the first cycle, then I pulled it out, levered it up (with help to hold the tray down)to detatch it from the alfoil on the tray, and enabling that later, when it is completely cooked, if you pull it from the tray you won't leave half the chicken behind. This is important! It goes everywhere if you leave half of it in the tray. Back in the oven for a further 50 minutes (you can pull it out after 40, if it 'smells cooked', but I found that left the bones still uncooked. The meat was done through and through, but the bones were still slightly pink). Pull it out and check, even if you do wait the 50 minutes, stab the breast, and thigh with the tip of a knife, or a cake skewer, if liquid comes out, it should be clear, though, mine didn't leak at all. If you are still unsure, slice down the skin between the leg and the body, and look at the base of the thigh.


Untie your chicken, if it is completely cooked, if not, put it back in the oven for a further 10-15 minutes, try not to overcook though. I think it will still get dry even with the effort put in to prevent that. Another good way to tell if your chicken is cooked through, is if the stuffing has expanded 1/4th to 1/2 again the original size.


Now, as this is going to be for christmas, and you have the family up, you want to make sure everyone is happy! So carve that chicken. If you have a big family, add chickens as you need, if you haven't a 2.5kg one like I did.


Oh also, be careful in picking up the bones of the chicken. You may leave the meat behind. -_-


Lets try this again... Ah! Here we go.


Doesn't that just look delicious? Now, how about the important part? The legs and thighs are -always- succulent and juicy, because the belly is where the chicken stores all it's fat. The belly, by the way, is the soft squishy part at the end of the breastbone. You have just cooked a chicken on its back. Yay for anatomy!

The important part, the real test is if the chicken -breast- is juicy, and succulent. This isn't all that easy, usually, when you are relying on the chicken's natural juices, it all ends up in the pan. But we pre-empted that, didn't we? We had butter and garlic to soak into the breast and look at that. Isn't this mmmmm. So good, at least, -I- think so.


Lastly, not leastly, once you have carved as much meat from the chicken as you can, or care to (I didn't bother with the back, it's too fiddly to peel off, and no one would take the small pieces other as snack type things in any case) you can carve the stuffing. Yes. Carve it.


The outermost edge of it will be crispy and firm, but the inner layers of the stuffing will be soft, moist and exceedingly edible. If you didn't over season with the herbs when you were making it, that is, and you shouldn't have. It really only needs a -little- amount. The frying of the onion and garlic earlier makes a sweetness in the bread, and having garlic in the stuffing as well as in the butter you stuffed the skin with, it means that the chicken flesh will be tender, juicy, and flavoured from skin to bone, with no lessening of flavour in any part, just potential 'extra' flavouring in some parts, like the oysters. And the back of the chicken, since that is the part of the chicken that was sitting and basting in the juices.

This tastes best hot, so either cook and serve it on the day, or cook it early and reheat it in the microwave later. Again, just be careful not to dry the meat out, so reheat it under gladwrap -- clingwrap -- with a few holes poked to keep the moisture in. And, enjoy! Oh, you -may- have to fight with your relatives, and your own self-control, to not eat this as soon as it comes out of the oven once tasted. I had to keep on chasing my family away with a pair of tongs so that other family would get to enjoy it! It is like... an exctatic food orgasm in your mouth. So good.

Deliciousness Delivered.

Thursday, December 15, 2011

Pork chops, beans, corn and OMG Mashed potato.


Just a prior warning before you read on, if you have issues with cholesterole, fat, or rich food, do -not- make the mashed potato as this recipe says to. It is very rich, and something for 'once in a blue moon' treat type thing, not daily, or even weekly consumption. Something special, not a staple for a balanced and healthy diet. In my opinion at least. I got the recipe from an acquaintence of mine online. I would say friend, but she is liable to smack me if I do.

For the mashed potato you will need:
2 medium- large potatoes
1 or 2 whole brown onions
1 tsp chicken stock (if you cook with salt, if you do not ignore this)
1 egg yolk (discard the white)
1 tsp sour cream
1 tsp mayonaise
1 tsp mustard (spicy or something that is not bland, I used French)
1-2 tsp of butter

Yeah, I know, that is a LOT of stuff for something as basic as 'mashed potato', but this is OMG Mashed potato. It couldn't be -simple- now could it? Peel and quarter the potatoes, or dice them as you want, put them in a pot. Peel an onion, chop off the ends, and put an X in the both ends, to let the juices of the onion to get out into the water. Those that cook with salt, add the chicken stock, or chicken soup powder, to the water now. I don't cook with salt, and so I didn't.

Once the potato and onion are boiling, put your meat on (I had pork chops) and leave it to cook and do it's thing. When the meat is ready for turning, turn it over, and fish out the onion from your potato water. Yes. Fish it out. Use a pair of tongs or whichever. You have a choice here, you can either throw away the boiled onion, dice a fresh onion for frying, or you can chop it up for frying later. I saved it -- I feel funny just throwing away food.

EDIT: I have since been informed that in this recipe the onion is a spice not a 'food' and so it -should- be discarded. Where's the fun in learning if you don't make mistakes? So you'll need an extra onion for dicing and frying later in the recipe. :D

At the same time, put the frozen vegetables on the heat (I had beans and corn) so that hopefully they will reach the boil just before you're ready to serve and you've finished faffing about with the potato. This way the frozen vegetables are thoroughly cooked, but not -over- cooked, retaining a bit of freshness crisp and more flavour.

So, carefully (it's hot!) dice the onion and pulverise it into little squares with the knife. It is soft and squishie, and slightly difficult. A few minutes before you serve, put the onion in to fry, and brown slightly, but do not expect much, most of the juice has gone into the water and the potato. While the onion is frying, drain the water out of the potato, put in the butter and mash it. Mash mash mash!

The sour cream, mustard and mayonaise are added now (clean the spoon off in between to avoid cross contamination, or use different spoons) stir them into the mashed potato. Turn the onion over, toss it so that it doesn't burn.

Crack the shell of the egg, keeping it together, very carefully strain the yolk from the white, and add the yolk ONLY to the mash. Discard the white, or use it for something else later. Stir the egg yolk through, mash the potato a second time to make sure everything is mixed in together. Serve!

Sunday, December 11, 2011

Marinaded Pork Spare Ribs


Simplest of marinades. No really! But, so good. This is the BBQ pork spare ribs I grew up on, and to me, it is the way they are -supposed- to taste. A bit of history; My dad initially came up with this 'marinade' as a thick basting sauce for a BBQ on the spare ribs, Weight Watchers brand Apricot Jam, and your run of the mill bbq sauce (sweet, not smokey). He painted it onto the ribs, and bbqued them that way.

My mum used the same recipe, same method, but she cooked them in the oven. And then you have me, who turned it into a marinade. What you will need:

1 cup apricot jam
1 cup bbq sauce
1 Tbsp of white vinegar
2 full racks of unmarinaded spare ribs (I think it's around 1kg?)

Mix the apricot jam in with the bbq sauce (it was about 6 Tbsp of each, so that's around a cup, right?) just make sure that you have it even between the two flavours. Stir and mix and break up the jam into slop. Add the white vinegar to thin it out from a sauce/basting to a marinade. Cut each rack in half (or thirds, or however many you need/desire) and put them into the marinade. Coat evenly, leave out for about an hour/half hour, depending on ambient temperature, and then turn them in the marinade. Put in the fridge and leave overnight or at least six hours before you intend to make dinner.

Put the oven on to preheat, around 180 degrees celcius, or for those who are all buh at the temperature, the same temperature you COOK EVERYTHING ELSE AT. Seriously, whole chicken, 180, pieces of chicken, 180, lamb leg roast, 180... You get the idea

Wrap two (or more) baking trays in alfoil, (tinfoil) with several layers. At least two, or else you'll be scrubbing caramelised marinade off of the tray for hours. Put the spare ribs onto the alfoil, curved sides up, spoon a little extra of the marinade into the scoop, put into the oven for 10-15 minutes.

Pull them out, turn them over, recoat with some of the marinade now on the more meaty side, and return to the oven for a further 25 minutes. When you first pull them out, is when you put on your vegetables, if they are long cooking and so on. About ten minutes before the ribs are done, pour the excess marinade into a pan, and heat it. Let it lightly simmer, stirring the whole while.

When the timer goes off for the ribs, pull them out, put on a plate, and drizzle the excess sauce over the top to give it extra flavour of deliciousness. It won't need much. Not featured; I cooked sweet potato and nadine potato wedges, with sour cream and sweet chilli sauce. It is not necessary, the ribs are more than enough of a sticky, delicious, undignified meal all on their own. Have a wash cloth/bowl handy and conveniently nearby for when you're finished, or else you will stick to EVERYTHING. My advice? Use a knife to cut the ribs into individual meat sliced pieces, and release your inner carnivore with fingers and teeth.

Who cares, it's delicious, it's messy, and it is FUN to eat. Mmmm.

Deliciousness Served.

Steak, gravy, sweet potato, carrot and garlic mushroom


Well, the title says it all really! This is one of your basic 'meat and three veg' healthy sort of dinners, something you can toss together with minimum of effort and get the delicious food out of the way and into the family. First off, sweet potatoes, while much more expensive than the 'normal' potato varieties, are SO GOOD for you. Seriously. Nearly zippo carbohydrates, they are a 'low GI' food, which means they leave you feeling fuller, for longer, on less! Which is great.

I was having an 'orange' food day. Which is why we have sweet potato and carrot. The mushrooms match the steak and the gravy links it all together. So, what you are going to need for this is:

Steak! One piece per person you're feeding.
Sweet potato: 1 inch slice per person, cut in half.
1/2 carrot per person.
1 cup diced mushroom (fresh)
1 tsp butter
2 cloves of garlic.

Whenever I cook root vegetables (they're the ones that come from under the dirt, potatoes, carrots) and pumpkin or whichever, the really -long- cooking ones, I always peel and chop and put them on to cook -first-. That way you can cook them on low heat for a good long time, without overcooking and they would be nice and tender. This singular pot is the start of my timing for the rest of my meal.

Once the sweet potato and carrot (put them in the same pot, the carrot cut into little disks, each slice of sweet potato cut in half) are boiling, you turn the heat down, leave the lid on with just a little gap to let the steam out, and put your meat on to cook.

Let the blood rise to the surface of the steak, cooking on a mid to low heat -- if you cook too high, the surface will be burnt and the centre still raw, which is blech to me. I don't want to have to fight my meat for the vegetables on the plate. Once the blood has risen, and formed a shallow puddle, turn it over. Why puddle? Because -- and this is possibly icky to a lot of people to think about -- all the delicious flavour, the moisture in the meat that we all know and adore? It is in the blood. So the blood rises through, flavouring, you turn it over, and it caramelises on the out side of the steak.

At this point, if you were cooking other vegetables, like frozen peas, frozen corn, or beans and so on, -now- would be when you put them on to cook. As it is, we are cooking garlic mushrooms.

Put your teaspoon (or so) of butter, into the same frying pan as your meat (save on washing up if you have room) let it melt -completely- but not start caramelising, bubbling or burning. Toss the diced/sliced mushroom and diced garlic cloves in, turning them with a pair of tongs, so that the butter is absorbed by the mushrooms before they really start cooking, they're just getting warm. Make sure that you don't have mushrooms ontop of each other, and let them simmer for a few minutes.

Turn your meat a second time (it should have gotten another fine layer of blood risen through) and this makes it what the chef's and restaurants call 'medium well done'. I like my food a little more cooked than that, hence the second turning. Toss the mushrooms, they should be smelling deliciously garlicly by now. Leave them, and the meat to sizzle lightly. Now, -now- is when you put the gravy on.

Just use packet gravy mix, around six teaspoons of the powder into a glass, mix in the water, stir thoroughly, pour into pot, and heat, stirring continuously. I have cheaty gravy, in that you boil the kettle, put six teaspoons of the powder into a measuring jug, add 250-300mL boiling water, stirring while you add the water, and keep stirring until all the lumps are gone and it's thick and delicious.

Strain out your vegetables (turn the meat one last time to seal the juices so they don't dribble all over the plate) put on the plate, turn off the heat, put the steak straight onto your plate, put the mushrooms either on the meat, or on the plate itself (it looks like more, and we eat as much with our eyes as our mouths) and pour the gravy over as desired.

Tada! Deliciousness served.

Saturday, December 3, 2011

Buffalo Mash of Deliciousness


Whew! Now here's a bit of an endeavour that I have just gone through in the past two days. I started this -yesterday- just after dinner. Why did I start it yesterday, because I marinaded the wings. It served 3 people comfortably. Here's what you're going to need to pull this off:

Wings
1kg of chicken wings (around 36 individual pieces, each wing makes two pieces)
1 1/2 Tbsp white vinegar
1/4 tsp cayenne pepper
1/2 tsp garlic powder
1/2 tsp worcestershire sauce (a generous galooping)
1/2 tsp tabasco sauce
6 Tbsp chilli 'flavoured' sauce -- A very mild hot chilli sauce, the one I used was Maggi but whichever works for you.
6 Tbsp sweet chilli sauce -- A decent sort, that has flakes of chilli and the seeds visible in the mix. Alternatively, one hot chilli, sliced with half the seeds retained whole, and 6 Tbsp of honey. Less or more depending on how flaming you want this.


Put the whole lot of those sauces and ingredients into a bowl, stir them together so that it is evenly distributed, joint and put your chicken wings into the bowl -- make sure that the chicken can fit in the bowl, obviously. And trust me, there is enough sauce mixture in that above recipe to fill the bowl and coat the chicken as illustrated. Cover, and leave in the fridge to marinade overnight until you're ready to cook it the next day for dinner!

Cheese Dip:
1/2 cup sour cream
1/4 cup crumbled bleu cheese (I used a full 200g and it was a little overpowering in flavour, unless you LOVE the cheese)
1/2 cup mayonnaise
1 Tbsp white wine (sweet)
1 1/2 tsp minced garlic


Again, pretty simple, dump the whole lot in, grate/crumble the bleu cheese into smaller pieces, mix it all into a bowl and mash the cheese within an inch of its life. Conversely, you could use a handheld blender, or food processor or something of the sort, but I'm oldschool and used a fork. Once it's prepared, put it in the fridge so it keeps chilled.

Preheat your oven to ~220 degrees Celcius, if you have a fanforced oven it's 170 degrees or so, as the fan makes it hotter and forces air around and so on, so things cook faster and you don't want your so painstakingly prepared chicken to dry out!

The chicken wings should be put onto alfoil wrapped trays with a decent amount of space between each so that they don't stick together, like this;


Put them into the oven, set the timer for 20 minutes and ignore until it buzzes. Once buzzed, turn them over to cook for another 20 minutes. That marinade the chicken sat in? You are keeping it! Put the leftover 'marinade' sauce into a frying pan, and heat it for about 15 minutes or so, just let it gently simmer with the lid on so that it doesn't reduce.

While your oven is heating up to usefulness, we shall get started on the side dishes! Which is the mashed potato, asparagus and capsicum. You will need:

1 medium potato per person (I served 3, so it was 3 potatoes, they were huuuuge) or 2 small.
1 garlic clove per potato (I used 5, as I said, loooots of potato!)
1 tsp of butter
3/4 cup of milk
1 cup of thin asparagus cut in half (If you did what I did last night, it was the 'leftover' asparagus)
1/2 cup of red and green capsicum.

Peel and cube your potato, put it into a pot, cut the base off of the fresh garlic cloves, peel off the papery shell, discard. Cut each clove in quarters or so, so that they are chunky, not minced or diced. Put the whole lot in a pot, with water, and bring to boil. Once boiling, put the asparagus and capsicum into a steamer ontop of the pot (I had a set for this) Or conversely put them into a pan to lightly fry on -low- heat.

When the chicken has five minutes to go, you are turning off the heat on your sides, drain and mash the potato, adding in the butter and milk so that it is very soft and well pulverised. Dish up on the plates, the asparagus goes ontop of the potato as a garnish, capsicum (or bell pepper if you are american) goes beside the potato, your chicken will have buzzed by now, pull it out of the oven, distribute the pieces between the plates (It worked out to 9 per person and 6 left over) and drizzle the sauce over the wings as well.

Distribute the cheese sauce how you like (I used little dishes) add celery sticks and voila, deliciousness is served!

Prior the celery.

The chicken when marinaded, absorbs the sweetness in the sauce, but not a terribly great amount of the spice, which is distributed when the sauce is coated over the top. It does have a fair bite to it, the sauce is much warmer than the chicken, so be warned. Celery and the cheese dip lessens the burn considerably.

Friday, December 2, 2011

Asparagus 'bolognaise'


Technically, it's not a bolognaise, but I can't very well call it a pasta now can I? What I am talking about is the 'side dish'. The meat in this is marinaded chicken steak, available from the butcher. If I marinaded it myself I would add that into this, but I didn't, so I wont. Simple enough? What you'll need to make a rather nice dish is:

A handful of narrow, raw asparagus, cut in half (about 2 cups)
3 whole tomatoes
1 brown onion
Butter
parmesan cheese

First of all, you're going to want to put your meat (if you eat it) on first, this really does not take all that long to cook. While that's happening, get a butter knife, and peel off a scrape of the butter -- about what you'd put on a piece of bread -- and toss that into a separate frying pan from your meat. Let it melt, peel and slice your onion into half moon slices, the basic slice if you're going to fry it, or whatever, so you can pick it up with a pair of tongs rather than needing a spoon or somesuch.

The onion is the first to go into the butter. Let it simmer away and soften, until the individual layers in each slice separate, and you have a tangled mess of semi-transparant onion in your pan. The handful of -thin- asparagus cut in half goes in next, with another scrape of butter on top. Toss it around to get the butter coating everything, and let it simmer on low heat.

This both fries, and steams the asparagus, letting it absorb the deliciousness of the onion and butter, while still retaining some crunch. Not much, but a little. Cut off the top of the tomato, slice and dice it and put it in the pan once the asparagus is half-cooked. Basically, if you filch a piece from the pan and bite into it, it tastes not -purely- asparagus, it's soft on the outside but still crisp in the middle and warm the whole way through, that's when you toss the tomato in.

(don't forget your meat, you should have turned it over by now)

Put the lid on and let the tomato steam and simmer until there is a fine layer of sauce on the bottom of the pan. Toss the asparagus and onion repeatedly through it to get a lovely layer, shake a -little- salt over it if desired, but there should not be much at all. You now have soft, soupy like tomato, crisper asparagus and strips of onion to compliment. It is ready!

Serve onto a plate, add your meat and grate a little bit of parmesan cheese on top to melt into the dish. Normal cheddar or a small dollop of sour cream would work just as well, but parmesan is slightly better for you and be honest, there's enough fat in there as it is with the butter!

And voila, you have a delicious way to eat raw asparagus that is very narrow and fiddly if you're not sure what to do with the stuff.

Protip: If you are cooking marinaded anything, like I did, fry it with the lid -on- the pan, to keep all the moisture inside the meat, makes it taste much more delicious.

Shortbread

Let's make shortbread today! This is one of the very first recipe's I ever looked up and attempted and good -lord- did the recipe make it difficult to make! Here's what we need:

1 1/2 cups plain flour
150 or 2/3rds cup of butter (not margarine, the 'bad for you' stuff)
1/3 cup cornflour
1/3 cup caster sugar (plus extra to sprinkle)
1 tsp vanilla essense
1/2 tsp baking powder.

Now the recipe I looked up goes on about beating butter and sugar until light and fluffy with a mixer, add flours, baking powder and vanilla essense and beat some more until combined and resembling fine breadcrumbs. Estimated time lapse (using a hand mixer) 20-40 minutes and you will be TIRED at the end of it.

Ignore this. I picked up a trick from making an apple pie. Dump everything into the bowl at once, and get in there with your hands. Yes. Hands. Up to the elbows in flour! Massage the mixture, spreading the cold bits of butter through the powder, it is -much- easier to break it up into the bread-crumby looking texture, and, it is a lot more fun. Estimated time: 10 - 15 minutes. And you want to do it again because you get to throw flour around. Seriously.

Put baking paper in a loose bottomed tart pan (18cm or so as a guide, but not 'strict') press it down evenly ish over the pan with your hands protected by another layer of baking paper. Put it in the fridge for 30 minutes or so, for the butter to set in the crumbs. While you're waiting for this to settle down, preheat the oven to 170 degrees celcius.

Take out your now firmer raw shortbread, sprinkle with a bit of caster sugar for added sweetness if you desire, and then put it into the oven to bake for 30 minutes or until a nice golden hue.

I felt like chocolate chip biscuits, so I made chocolate chip shortbread. Exact same thing as seen above, but with around quarter to half a cup of chocolate chip bits tossed in at the very end and mixed through. Add more, or less as you desire. Either way, the end result is delicious!